Showing posts with label decoupage. Show all posts

Saturday, April 20, 2013

Decoupage Seashell Frame


I was happily surprised when my neighbor Stephanie invited me 
over to her home for an informal craft party this afternoon.

I wasn't sure what to expect, 
she takes X-rays all day long and I had no idea she was into art.


She mentioned she had picked up some acrylic paints and 
wooden frames at Michael's on sale.


So I went back to my studio and collected some of my favorite

 decorative napkins to share with the other women who were 

coming together for some creative fun.


The pretty napkins were a big hit!


It made the play date so much less intimidating to the new artists.

Decoupage was a word they had not heard before.

I shared how to pull the napkins apart and carefully rip around the 

images they wanted to use on their frames and layout the designs.

Some stamped letters and painted the background with paints, 

others left the natural frame and did a color wash on top the images.


Then I showed them how to decoupage the images in place with 

good old fashioned white glue watered down and using a paint 

brush starting in the center and working our way out to release any

 air bubbles.


They were thrilled with the results. 

 I am sorry I hadn't brought my camera to catch photos of all the creativity and fun.


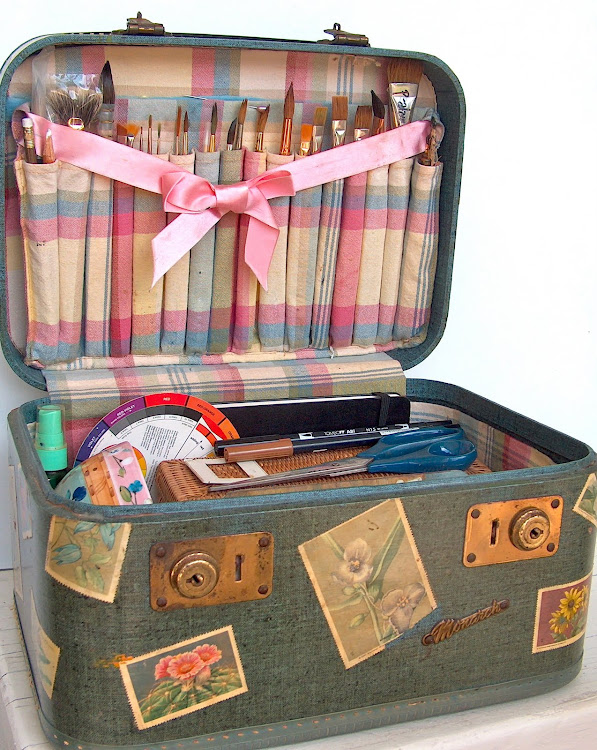
I have only my example to share with you today.


Sunday, January 22, 2012

You are LoVed


Here is the latest project I am working on,

a pillow shaped ceramic vase I made and glazed on the inside.

After painting the background I began decoupaging with paper and lace,

paint and marking pens.


It is not quite finished yet,

I am looking for small alphabet stamps to add along the ankle line

"you are loved" in walnut colored ink.


This is created for a sweet little girl in the hospital battling cancer.

{ Please keep her in your prayers }

( even better, I found a press on alphabet in chocolate by Fiskars! )


Homage to and inspiration from Julie Nutting's wonderful book!


Saturday, January 15, 2011

Magenta and yellow color scheme


this is how one thing can lead to another...


beginning with these beauties found in the garden


and natures color scheme

add in miscellaneous found scattered about the studio


next thing you know the lid to one of my bisque boxes is being decoupaged


using the graphics from a decorative napkin torn to size


with a little watercolor painting added to accentuate the pink

& complete the look


more about playing with napkins on bisqueware here


Saturday, October 2, 2010

Fun & camaraderie


sharing talents with each other


{ hand made goodie bag gifts }


Last Saturday I hosted a workshop with Julie Nutting here at Summerland Cottage.

Since the studio is a bit messy we enjoyed the fun alfresco in the courtyard.

Julie taught us how to create the mermaid decoupage you see above.

Always in art classes you will find each piece is as uniquely different as the individual,

and though I share it in this photo I still have work to finish on mine.

After a delightful lunch I had the opportunity to demonstrate painting on a bisque dish

and encouraged adding values to give it depth and add interest.


sample dish

Every one had such a great time, the weather was perfect,

and all have creative seashore inspired tokens from our day spent together.


Sweet Beth's creative writing talent and telling of the day we shared surpasses mine,

and she took the time to take photos,

so enjoy reading and viewing much more on her blog couture over coffee


Sunday, August 8, 2010

Poppy Orange


I've been doing a bit of sewing lately and seem to be frustrated

trying to find needles and straight pins.

So I pulled out my old sewing box tucked under the cabinet

and discovered some charming vintage sewing paraphernalia...


using a bright orange Bahia Gold cigar box

I corralled all the needles into the box

then I created a color coordinated collage

with some of the gems on the lid for easy access.


I couldn't resist including the now-famous

orange handled scissors by Fiskars,

first introduced to the world in 1967,

they seemed a perfect fit !


.

Thursday, July 8, 2010

Inspired by my surroundings

.
and having an assortment of bits of paper, glue and a wood box

among other miscellanies on top of my studio work table

that needs to be cleaned and organized,


I choose to create something new before tackling the task at hand


Friday, June 4, 2010

Vintage luggage remake


.
Originally intended to carry a girls makeup or used as an overnight case,

this little number had been through the test of time.

When I spied it, the inside lining was in sorry shape and the plastic handle missing,

but not to worry the forlorn piece had some redeeming values.


The size and shape was perfect for my needs

and with a little effort and ingenuity it was given a new life.


Vintage flower stamps where decoupaged to the outside

to perk up the lack luster color and a new leather handle added.

A bright plaid lining replaced the faded, stained, and torn satin lining

and a velcroed pocket with pouches was fashioned and added in to hold paint brushes.

It's now ready for traveling...


I'm thrilled to have Cloth Paper Studio Magazine share the post with their readers!


Tuesday, June 1, 2010

Decoupage, paper doilies and drawers


Probably everyone has seen the storage boxes from Ikea

that are similar to this one shown.


I already had 2 misc. drawer pulls and created 4 more new pulls with clay.

I painted it white, decoupaged bits of paper doilies that I aged in the salt air first

then added the new drawer pulls.

( I like that I can create more or different ones as I wish,
I created more drawer handles with crystals here )

and a vintage luggage update with decoupage here


I love how the bird came out !

Then having bits of paper doilies left over I went in search of something

more that needed a little something...


Just a little fun in the studio today...


Friday, April 23, 2010

Playing with paper napkins on bisque ware


I've made a collection of ceramic pieces that are glazed and fired on the inside

and I left the outside as bisque to experiment with using different mediums...


I pulled out part of my paper napkin collection and my watercolors

and began the process, ripping and gluing, then adding paint

and stamping as I went along...


I have a sweet little box for storing seeds after my first attempt...

I'm seeing unlimited potential !

more decoupage fun here
.