Showing posts with label DIY project. Show all posts

Saturday, May 16, 2020

Mini books with custom bound covers


One of my favorite magazines was looking for ideas for handcrafted projects using a purchased item and personalizing it in some way. They were asking for creative, inexpensive, simple projects that ideally take 30 minutes or less to make. 

This is what I came up with for them!


Using fun little fabric memo samples from the design center and coordinating fabrics, I created little book covers for post-it tablets.


I have so many cool and unusual fabrics that I have collected over the years, it was pure pleasure perusing through them to find patterns and embellishments that were small enough for the size.


Using cardboard found at Trader Joe's used for package dividers, I cut pieces just a tiny bit larger than the post-it notes were. Then glued the fabric to the cardboard and created covers.


had so much creative fun adding the unusual embellishments.


I chose a monochromatic color theme.


Some have ribbon ties, or embellishments, others cut out appliqué.


Then I covered a large box that looks like a book to hold all of them in.


Hoping they like them!


They did! 

Here is the article.


.

Monday, April 23, 2018

Fabric covered hanger


Feminine fun with scrap fabric


I have a wonderful stash of favorite discontinued drapery fabric sample swatches that I've stacked in my art studio.

I chose to pull out a favorite white linen with a blue rose floral to create a hanger cover for my new blue blouse with a wide collar so that it wouldn't slip off the hanger.

It was super easy. I just laid the hanger on the backside of the fabric and traced the outline of the top of the hanger 3/4 of an inch above it. Then I copied that creating a second and cut them both out.
With right sides pinned together, I sewed them together leaving the opening at the top center and doing a basic hem along the bottom.
Putting the right side out I tucked the top center opening in and pressed the piece flat.

The ruffle of the same fabric I added just for fun and to jazz up the bottom.

I'm thrilled to have it included in Greencraft 
magazines summer issue!


.

Friday, February 17, 2017

Treasured vintage button collection


I pulled out my button box and gathered together over 50 

of my all-time favorite vintage gold toned buttons.


A wide piece of elastic was the perfect base to attach them to. 

I cut it to fit my wrist and dyed it to match.


Some of my treasured collection of vintage gold tone buttons


that have been hidden away for so long are brought out and


 all lovingly hand sewn onto a piece of wide elastic 

that I dyed to match.


I love it!   


Who says you can't have your cake and eat it too!


I couldn't seem to stop with just one!


Grateful to have it included in the latest issue of 

Jewelry Affaire!
.


.

Thursday, January 21, 2016

Latest sewing project


is a canvas tote with a Ralph Lauren paisley pocket 

and blue cord detailing.


It was one of those wonderful canvas bags 

that comes with the company's logo printed on the front

that my neighbor was giving away.

 I chose to cover the logo with a great big pocket

and a little embellishing.


Perfect for toting your favorite magazines in!


Grateful to have it published in Greencraft Magazine!


.


.

Saturday, August 15, 2015

Ceramic cameos


Fabulous collection found on 
Sir John Soane Museum


After viewing this amazing collection

I was inspired to mat and frame a few of my own ceramic cameos, 

just for fun!


.

Thursday, May 14, 2015

Experimenting with mishima technique


Mishima is a technique of inlaying slip, 

under glaze, or even clay into a contrasting clay body, 

the main clay body of the pottery piece.   

Creating a mishima piece is pretty simple. 

I started by creating the vase shape then carving out the design. 

I chose to fill in the carved lines with a sepia tone,

then sanded off the excess material then sponged it clean.

Just for fun I punched the holes with a straw 

so that I could add a ribbon to the top of the vase.


After drying the piece I added glaze. 


and put it in to be fired.

I was surprised when it came out of firing and the colors 

seemed to have been lost, it was so muted.


Ha! That is why I call it an experiment!


I'm liking this quote,

“Life is an adventure of passion, risk, danger, laughter, beauty, love; a burning curiosity to go with the action to see what it is all about, to go search for a pattern of meaning, to burn one's bridges because you're never going to go back anyway, and to live to the end.” 


Monday, April 6, 2015

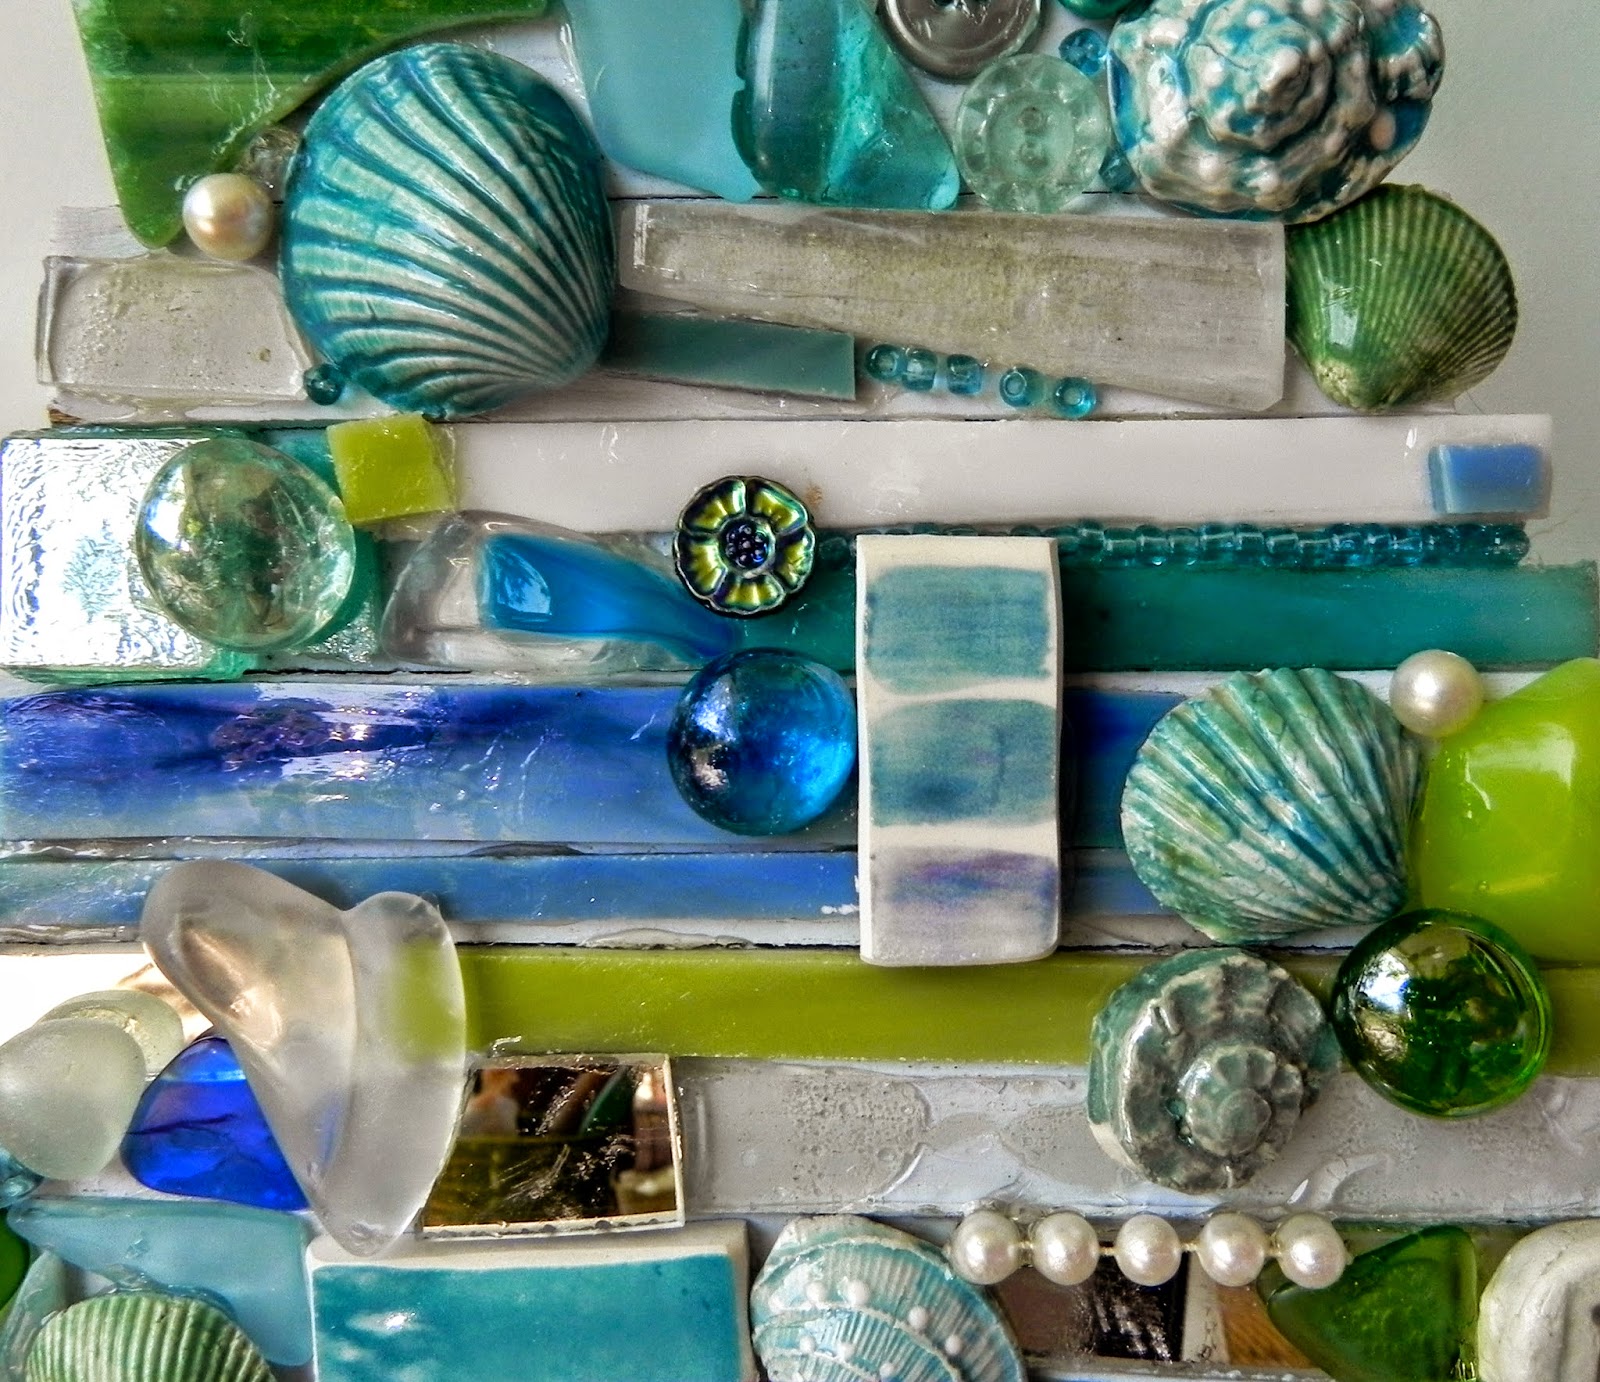
Mosaic glass and ceramic seashore themed tree


I found the basic block wood tree at TJ Maxx and more.


It had a quirky lean to it even though it stood tall and strong.

Something about its simplicity and shape pulled me in 

even before I saw that it was marked down to $9.00


 It hung out with me in the cottage studio and bits of this and that visited

 just to see if they were compatible 

and what creative direction we would be taking.


It began to come together with some cool glass tile pieces leftover 

from a back splash in turquoise and blues 

and a few of my latest color tests on tiles 

in analogous colors cut into strips to fit in.


Bits of sea glass, ceramic seashells, pearls and even a few stray

 buttons, bright colored marbles all found a new home.


Here are a few fun closeups...

.


Thrilled to share the fun in Somerset's Holiday issue!


.

Friday, January 30, 2015

Matelasse apron


I found this sweet old fashioned looking quilted pillow sham 

being discarded and decided to rescue it.

I loved the colors, greens and pinks with a floral motif


and best of all it was matelasse, the best fabric for an apron because 

it is so absorbent and perfect for a messy ceramic artist like me.


I cut away at the top corner


 and used the cut away piece as a pattern 

to cut the opposite side as well.


Then I folded over the back side twice, 

rolling and pinning it as I went along.

That made it easy to hand stitch it down.


 I cut away and used the bottom half of the back lining of the 

pillow case to create apron strings


by cutting it in 3 even pieces 

and making long tubes to attach to the neck and two sides.

Look how cute the scallop edging at the neck 

and along the sides of the apron shows so well!


This was super easy 

and I didn't even have to pull out my sewing machine.


Practical and pretty!


Grateful to share the creativity with GreenCraft magazine readers!


.