Showing posts with label altered clothing. Show all posts

Wednesday, November 22, 2017

Appliquéd vest


My latest creative venture is using a discontinued drapery swatch 

with fabulous embroidery to embellish a simple vest.


I especially like the layout on the back!


I carefully cut out all the beautiful embroidery 


and laid it out on the vest

then hand stitched it in place before sewing all the pieces down.


A little creative fun at the cottage studio today.

Grateful to have it featured in the latest issue of 

Altered Couture Magazine.


Saturday, June 3, 2017

Layered lace T-shirt


I came across the cream-colored Free People long sleeved t-shirt with the lace inserts in the sleeves and bodice at my favorite T.J. Maxx store. I am always drawn to the Free People clothing line, and I couldn't pass up this cute top at such a great price with all the detail work. Unfortunately, I didn't try it on until I arrived back at the cottage. I have to say I was not thrilled with the length. It seemed awkward, it was not short enough to show off a fit midriff and was not a flattering length, but I liked the design and color, so I went into my overflowing art studio and began pulling out and digging through my stash of unusual and mostly vintage laces, trims, and doilies. There were several potential finds set aside and then to my delight I finally discovered in the pile on the floor in front of me the perfect cream colored sheer embroidered dresser scarf from the 50's! 

I centered and laid the dresser scarf next to the bottom hem of the new t-shirt and chose to cut out of the center of the scarf a slice just an inch and a half wider than the width of the t-shirt.
Then I cut that piece in two but not in half, that would be too boring for me. I chose to make the front panel considerably shorter than the back so I cut approximately one-third the length for the front, and the longer piece was for the back. I liked that the hem on each was already finished in a darling scallop design, so all I had to do was turn over the side seams twice and do a quick straight stitch down the sides, and then I attached the two pieces to the front and back of the t-shirt with a simple zig-zag stitch. I left the sides slits open for ease and fit. 
Originally I was going to use the two scalloped end pieces of the scarf on the bottom of the sleeves folded in a french cuff design and attached to each sleeve  but changed my mind as the length of the sleeves was already very long and I have a tendency to shove up my sleeves when wearing little t-shirts while creating, especially in clay one of my favorite mediums.

Suggestions,

When shopping or going through your closet to select a top to embellish, keep in mind that a cream-colored t-shirt is going to be easier to find a matching lace for embellishing it, rather than a colored one unless the colored one has white or cream lace inserts already.

Thrift stores and Etsy are both good places to find vintage laces and a scalloped edge one like the one used here would be best.

It's always a good idea to launder your t-shirt and the lace you will be using before cutting and sewing them together.

What you will need

a cute t-shirt

a lace dresser scarf or doily

thread to match the color of the t-shirt

straight pins

sewing needle

scissors

iron


Instructions

Place the lace scarf along the edge of the hem of the t-shirt and cut approximately 1 1/2'' wider on each side than the t-shirt width.

Carefully fold 1/2'' and iron the sides over twice and then stitch it down evenly along the outside edges. 

Then attach the shorter rectangle of lace to the front of the t-shirt by hand or with a zig-zag stitch with your machine.
Then attach the longer rectangle to the back of the t-shirt.


A photo included as a visual for cutting lace scarf.


Grateful to have it included in the latest issue of 

Altered Couture Magazine!

.


Saturday, September 20, 2014

Antimacassar


Just in time for fall.

Curl up on the sofa with some hot tea, 

a few sewing supplies, your needles and a spool of thread 

for a little creative fun. 

Embellishing a favorite long sleeved tee

with what is known as antimacassars.


It is an odd word with an interesting history.
Macassar oil was a tonic for the hair commonly used in the early 19th century. The fashion for oiled hair became so widespread in the Victorian and the Edwardian period that housewives began to cover the arms and backs of their chairs with washable cloths to preserve the fabric coverings from being soiled. 
In 1852 these started to be known as antimacassars. 
They came to have elaborate patterns, often in matching sets for the various items of parlour furniture; they were often made at home using a variety of techniques such as crochet and tatting.


.


What you will need

a pair of  antimacassars

a long sleeved top

thread to match the color of the antimacassar 

strait pins

sewing needle

scissors


Instructions

Place the  antimacassar along the edge of the sleeves hem.

Pin in place.

Carefully hand stitch it down along the outside edges of the design to keep it in place.


If the top has buttons that are not to your liking, 

consider replacing them with your favorite vintage buttons!


Grateful to share the creativity in Altered Couture Magazine!


.

Saturday, August 2, 2014

Embellishing with daisy chains


Just a simple daisy chain vintage lace embellishment 

added to a simple t-shirt for girly fun.


                                                    .        
                                                             .Super quick and easy peasy.


Sunday, March 18, 2012

Embellished Cardigan


I found the sweet peachy pink cardigan at The Gap

and loved the color, fit and length.

By now, my readers would know I can't seem to

just leave it as it was created.


I have several lengths of beautiful vintage laces

needing to come out of hiding and be shown off.

They seem the perfect embellishment.

I layer them and then

they are easily hand sewn on to the sweater.


Then feeling it needs a bit more,

I pull out the treasured vintage button collection

and pour it out on the table looking

for just the right lovelies to create a button bouquet.


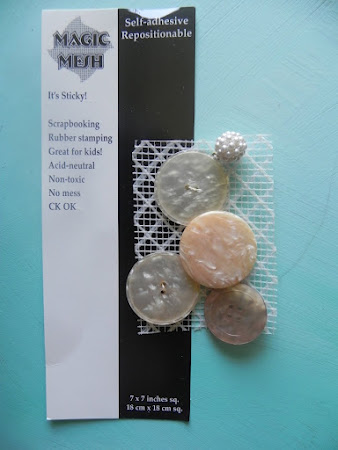
The magic mesh comes in handy for laying out the gems

and then sewing them into place.


I cut away the extra mesh and add a magnet to attach it with,

so the fabric will not be damaged by the weight of the pin.


Fortunately I have the perfect vintage crochet top

that works beautifully as a camisole underneath.


I'm loving the happy spring colors being shown this season!


Saturday, January 21, 2012

Sweet heart graphics


Roxy Tee shirt found at T.J. Maxx yesterday with this cool graphic design

printed on the front


but looking like an unfinished pencil drawing without color,

finds its way home with me and ....


I pull out my fabric paints for a pick-me-up,

filling in the background to pop the design,

because I really need another painting project !


Knowing I would most likely be wearing it with jeans

I chose deep blue and began painting in the bottom of the heart design,

and taking creative license, chose to eliminate a few extra flowers

and web designs by painting the dark blue right over top of them.


Then I lightened the blue shade as I worked my way up the design

ending with a beautiful turquoise color at the top.

Sweet! & Valentine's Day is less than a month away!


Monday, January 16, 2012

Simple Scarf


While viewing Ralph Lauren's fashion week photos

of ready-to-wear for the spring 2012 collection


showing a myriad of beautiful neck scarfs in pastel colors

including peach and baby blue along with flowy chiffon skirts in sherbet-florals,

worn with cashmere sweaters in sunny yellow and apple green.


I'm inspired to take a look through my current collection of scarfs

to see what I have that may emulate the same look.


I find this little number in the same genre

and discover this variegated eyelash thread in a similar colorway.


I can't seem to resist adding a bit of embellishment to give it some texture

using the variegated eyelash thread.


With super easy basting stitches added

this simple scarf can easily transform any ordinary outfit

into something special!


Grateful to have it included in Somerset Life Magazine 

and 

Creative Living Ideas magazine!


Monday, January 9, 2012

Embellishing with Crochet


I totally surprised myself...
I would never have guessed I would take up crocheting.
This is the story of how it came to be...
I found a dusty pink crochet-look sweater, and loving the color, classic styling, and under $25.00 price, had to have it.

Later in the day I popped into Michael's to purchase small alphabet stamps for another project swirling in my imagination. Unfortunately they didn't have any BUT I did meet the helpful and talented Diana sitting at the front of the store demoing a little green yarn crochet flower....that she gifted to me, thank you Diana!


On my way back into town I stop at Big Lots for baby oil, cotton balls, and various sundries and spy this ball of yarn in their craft section. I love the color, do not knit or crochet but feel compelled to purchase it! Really it is all of a dollar and upon returning back to the cottage and unpack, happily realize it blends beautifully with the color of my new sweater!

I pilfer through a vintage sewing basket full of odds and ends remembering seeing a crochet hook in it, and much later that evening, while curled up on the sofa in the sitting room watching the latest episode of Downton Abbey, I attempt to mimic what Diana had been demoing. After several attempts on the sleeve I finally find my rhythm, pull out the practice yarn after jotting down the algorithm that seems to work.


Not being familiar with crochet terms yet it is a bit vague but doable and I begin with the sleeves, and then tackle the long shawl collar the next evening.


There are certainly a few glitches as I struggled with the yarn that had 3 different type threads in it, but I am pleased with the overall look and especially love how the scallop edge adds to its femininity.


I highly recommend


.


Saturday, October 29, 2011

It's all in the details


I spied the tunic length Zone Bleue design

in a charming little clothing boutique

on Forest Avenue in Laguna Beach named Duet

that specializes in unique and often hand made pieces

from all over the world.


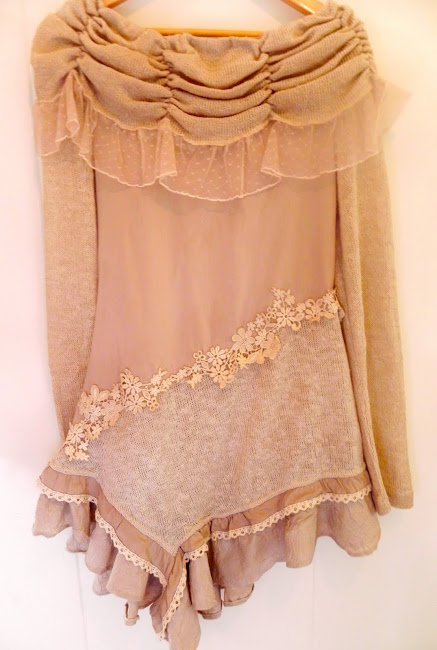
I was drawn to the feminine ruched collar
and asymmetrical design.
.


It fit beautifully,

but the color of the top was not flattering for my skin tone,

it being a grey/beige hue


There was enough cotton in the fabric contents
that I believed it could be dyed to a warm beige color.
Upon returning home with the new acquisition
I filled the kitchen sink with warm water
to wet the entire garment
then drained most of the water and added in the contents
of a pot of coffee that had been sitting for half of the day.
I let it soak for about 15 minutes before gently rinsing
and hanging the garment to dry,


fortunately the color came out exactly as envisioned.

As I was pressing the piece I wondered why

the designer had chosen to leave so much of

the over lock stitching exposed on the edges

of the ruffles.


Was it a conscious decision to meet a certain price point?
Maybe I've been watching too much of the show "All on the line"
on the Sundance channel with Joe Zee.
Either way, in my world I couldn't seem to let this charming
design just be as it was created,
something inside me causes me to tweak it and make it my own.


Possibly it is the possessing of a cachet of delicate delights
needing to be seen and not tucked away any longer.

I felt it needed a little more and began foraging through my
cluttered studio to find the perfect vintage laces and trims to add
to the top covering the exposed seam edges.


I chose to also dye the lace pieces selected
for embellishing in coffee
before attaching them to the garment


and pieced several laces
together for additional detail
on the diagonal seam of the back of the tunic.


The lace you see at the collar of this sweet piece
was originally going to be an underskirt on the garment
but after pinning it in place
I realized it was adding too much bulk along the bottom
and found instead the lace was the perfect embellishment
to add along the bottom of the ruched collar


and included it on the sweet tie at the collar
and then recreating the tie into a rosette.


supplies needed...

miscellaneous laces and trims
needles, scissors, thread, sewing machine optional
pot of coffee
a creative imaginatio
n...